

Suits all ND's
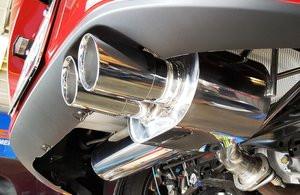
This is a modified version of our all Helmholtz Super Street muffler that adds small chamber dual tip muffler to add lots more user control, four different sound settings with the included MIXING BAFFLE, over TEN different sound level and tone variations if you mix in the optional packed baffles available on this site. Nonetheless, this is a VERY aggressive muffler by design with roots in our RACE muffler, with the included mixing baffle fully inserted left (Driver's) side to bypass the final chamber this muffler becomes precisely the same layout and sound as the RACE muffler. Progressively back out the included Mixing Baffle to lower the frequency balance of the result and overall DB level.
UPDATE
We now include a Mixing baffle that effectively converts this muffler to same sound as the Race muffler when fully inserted passenger side tip, adding back in the higher frequencies the chamber would otherwise convert lower (to cover the costs of adding that blocking baffle we are ending the RoadsterSport script on the tips and deleting the less effective pair of cone baffles). Result is more effective control over tone and the balance of treble vs bass than any other choice, max upper frequency fun is mixing baffle fully inserted driver's side tip, back it out to the other positions to progressively shift frequency balance lower.
Separately on the site is a fiber packed long baffle that effectively converts this unit to same frequency balance as the SuperStreet Single Tip. Thus, now essentially THREE mufflers in one here, the Race with included Mixing baffle, the SuperStreet Single tip if you add packed long baffle (item 60-1325SSTT), or skip the long baffles and use standard length baffles in one or both tips (item 60-1324T) to keep the bass heavy frequency balance but lower the volume. Result is a 17 pound street muffler with MORE flexibility than all other choices.
You get the great look of the RoadsterSport rolled and polished twin tips, the clean flow of the shortest possible path from the midpipe to the exhaust tips to max your horsepower gains, unprecedented level of user adjustment...and minimal weight with these features.
Driver's side tip pathway is essentially a straight through and adding Mixing Baffle to driver's side tip progressively cuts off the chamber and massively lowers the bass notes and raises the upper frequency response, etc.
SHIPPING NOTE...ships factory direct to you. All POLISHED stainless steel construction. Uses stock hangers and connects to either our RoadsterSport midpipe or the stock midpipe.
Just one bolt under each tip to make the baffle easy change.
BRIAN'S APPLICATION NOTES: Mild when cruising on otherwise stock ND, delivering a classic sports car BARK and THROATY RUMBLE when you wind it out to redline, lots of fun burble when just playing with the throttle around town. Easily UNDER our local SCCA sound limits on otherwise stock Miata (our SCCA limit here is 93 db at 50 feet and even in the rain our testing found it easily under our strictly enforced sound limits). Also easily under the most strict 92db days at Mazda Raceway Laguna Seca when used on otherwise stock ND. Result is TONS of fun, will make many of you laugh out loud. You also get the best performance from the straightest and cleanest flow out the exhaust cutout you can get, and much lower weight. Nonetheless, this choice is NOT for the faint of heart!!! The most common question we will get on this one is: "will it be too loud" and we cannot answer that one for you because the "right" sound level is a matter of entirely subjective personal preference.
Not designed for use on car with aftermarket header or aftermarket midpipe, designed for max fun on otherwise stock exhaust system. Adding header adds a massive amount of sound, thus we suggest customers considering adding a header should look to our SuperQ choices for best control of results with header change.
The issue with using adjustable length midpipe with this ultra light three hanger design is that customers rarely get the adjustable length set correct and that can put too much stress on the connection between helmholtz chamber and straight pipe. So if you insist on adding midpipe with this design be careful to get length of midpipe accurate (hangers aligned nicely straight up and down for midpipe) and use thicker hanger from the rear to better support the bigger midpipe.
BRIAN'S INSTALL NOTES:
Installation of this MX5 muffler is SUPER EASY...just two 14mm bolts to loosen! When you open the big box you will find separate foam wrap on the exhaust tip, leave that foam around the tip during your install to protect the polished tips and your car's soft plastic in the exhaust cutout. Use gloves. Note the 'bolts' from the factory are actually studs with springs and nuts and the factory usually jams the nuts on so hard that unbolting it will bring the stud out too. If that does not happen then use 13mm long socket to unscrew the studs (or use jam nut technique where both nuts are put on one stud against each other and then wrench used on the inner of the two to back out the stud). Then lube up the stock exhaust hangers with dish soap and yank stock muffler back and forth to work the soap into the rubber hangers and then the muffler will slide off those rubber hangers easily. Then hang the new muffler on the wet and soapy rubber hangers and torque 'bolts' with the springs back in place to 30ft/lbs. Now you can remove foam tip wrap. Option to remove the baffle too, to do so loosen bolt that holds it from under the exhaust tip and use it as handle to shake the baffle loose and then unscrew bolt the rest of the way and pull the baffle (pulling baffle raises the sound slightly, I like the included mixing baffle fully inserted driver's side tip or one step back from full deep). IF not removing baffle, check torque on the retaining nut, 15 ft/lbs is enough thanks to lock washer included. Note the muffler to midpipe joint is a ball socket connection for the first time on a MX5, it is designed to move a lot, so please do not add sealants that will gum up that dry ball socket joint. Our pipe size is bigger than OEM for best performance/flow and the stock donut gasket sinks a bit deeper into the mouth of our setup than with factory muffler 'mouth'. Note that our flange at entrance to muffler is designed as a dual purpose item that allows going to flat gasket if you later go with our 2.5 inch midpipe, at which point the midpipe has a flex joint to replace function of the donut and you get a clean 2.5 inches of flow all the way, which is not possible if we stay same small pipe of stock muffler.
 BRIAN'S APPLICATION NOTES: Without baffles almost mild when cruising on otherwise stock ND, delivering a DEEP BASS THROATY RUMBLE when you wind it out to redline, lots of fun burble when just playing with the throttle around town.
BRIAN'S INSTALL NOTES: Installation of this MX5 exhaust is SUPER EASY...just two 14mm bolts to loosen! When you open the big box you will find separate foam wrap on the exhaust tip, leave that foam around the tip during your install to protect the polished tips and your car's soft plastic in the exhaust cutout. Use gloves. Note the 'bolts' from the factory are actually studs with springs and nuts and the factory usually jams the nuts on so hard that unbolting it will bring the stud out too. If that does not happen then use 13mm long socket to unscrew the studs (or use jam nut technique where both nuts are put on one stud against each other and then wrench used on the inner of the two to back out the stud). Then lube up the stock exhaust hangers with dish soap and yank stock muffler back and forth to work the soap into the rubber hangers and then the muffler will slide off those rubber hangers easily. Then hang the new muffler on the wet and soapy rubber hangers and torque 'bolts' with the springs back in place to 30ft/lbs. Now you can remove foam tip wrap. Option to remove the baffle too, to do so loosen bolt that holds it from under the exhaust tip and use it as handle to shake the baffle loose and then unscrew bolt the rest of the way and pull the baffle (pulling baffle raises the sound slightly, I suggest starting with baffles removed). Note the muffler to midpipe joint is a ball socket connection for the first time on a MX5, it is designed to move a lot, so please do not add sealants that will gum up that dry ball socket joint.